Validate E-mail using SPF and DKIM
This page was originally created on and last edited on .
Introduction
So you've set up your own custom domain (let's say tunetheweb.com as an example) and you plan on using that domain for e-mail so you look like a professional company. All good but you obviously don't want on your e-mails to end up in spam folders, nor do you want spammers to send mails looking like they came from your domain. This both looks bad on you and can lead to a lot of bounce back to you leading to a load of rejection mails in your inbox - for mails you didn't even send!
There are two settings you can apply to allow you to control this: Sender Policy Framework (SPF) and DomainKeys Identified Mail (DKIM):
- Sender Policy Framework (SPF): This allows you specify which mail servers are allowed to send mails for your domain. There is of course nothing to stop a spammer sending a mail from their mail server for your domain, but e-mail clients can then check the SPF policy for your site, see it's not on the approved list and then choose to either ignore the mail completely, or at least mark it as likely spam.
- DomainKeys Identified Mail (DKIM): This allows you to sign your e-mails using a private key and then e-mail clients can verify the signature using your publicly available DKIM header to confirm the mail came from you. Again if spammers send a mail which has not been signed or does not match your public DKIM value (proving it was signed by the private key known only to you - and therefore proving it came from you), then they can flag it as spam.
So together these values allow you to reduce the sender and e-mails from your domain and additionally sign the mails. If both checks pass then that's a strong indication the mail is not spam and so most e-mail clients will not put it in the spam folder. Any mails which are actually spam and didn't come from you can either be ignored completely or at least flagged as spam.
How to set it up
SPF and DKIM are DNS headers so to set them up you need to add value to your DNS records. How you can do this depends on how you control your DNS records. I use Amazon Web Services (AWS) for example and so can edit my DNS records in the Route 53 section of the AWS Management Console.
The values you need to add will depend on your e-mail provider. If you look in their help section you can usually find instructions on adding SPF and DKIM settings. I use Google Apps for my mail and Google have a page on how to Configure SPF records to work with Google Apps and how to Authenticate email with DKIM but I'll walk you through the set up here.
Configure SPF for Google Apps
Google suggest adding the following SPF policy:
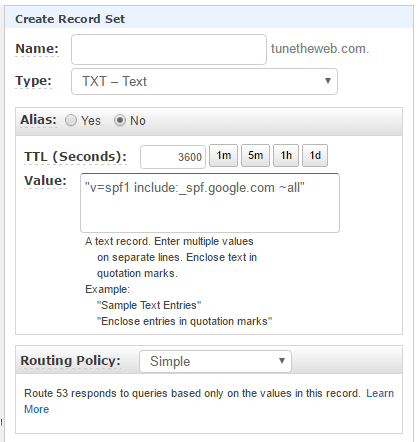
v=spf1 include:_spf.google.com ~all
This states that only google.com can send e-mail and any mail from other e-mail servers should be allowed but flagged as spam (the ~all) piece. You can add a more strict policy (-all) instead if you wish. So you need to add this value as a TXT record in your DNS. For AWS this involves logging in to the AWS Management Console, clicking on Route 53, clicking on the Hosted Zones or Domains and then into your domain. Then enter the above value as a new TXT record with no name and alter the Time to Live (TTL) to 3600 seconds:
Click "Create" and that should be that. DNS records can take up to 48 hours to propagate around the internet but in reality I find they are usually much quicker than that - often a few minutes is all it takes.
You can validate your SPF is set up correctly by using the DKIM validator (despite it's name it also checks SPF). This involves sending an e-mail to a randomly generator e-mail on the site and then it will examine the incoming mail and check the SPF setting for you.
Configure DKIM for Google Apps
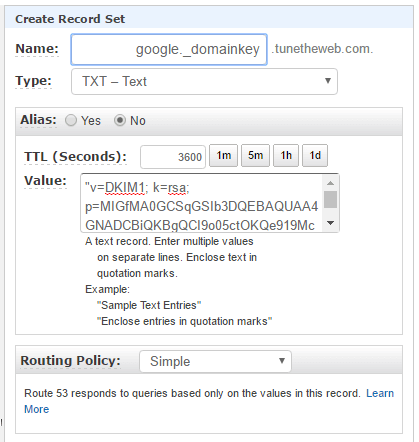
Adding DKIM to Google apps is almost as easy but does involve Google generating the private key (which it doesn't show you) and then it giving you the public key to enter in your DNS settings. To do that log in to your Google Apps Admin and go to Apps > Google Apps > Gmail > Authenticate email (or alternatively search for DKIM), select the domain you want to add DKIM for (if you only have one then it will automatically be selected for you) and click Generate New Record. This will give a TXT record which you can add to your DNS similar to what you did above for SPF - however you must set the name to the given name (for Gmail this will likely be google._domainkey):
Click "Create" and again wait until up to 48 hours to propagate around the internet (again in reality it usually takes much less). For this one you might want to wait a little longer before turning on DKIM in Google Apps, as once you switch that on, mail clients will attempt to validate mails so they have to be able to read the DKIM setting from their local DNS. Once you are happy you've left enough time (or have waited 48 hours to be absolutely sure) you can go back into Google Apps at Apps > Google Apps > Gmail > Authenticate email and click on "Start Authentication"
You can validate your DKIM is set up correctly by using the same DKIM validator discussed above.
Sending from other servers
If you are only sending mail from your e-mail provider's email server then above is all you need to do. However if you are using any other mail servers to send mails from your domains then they will not take into account these settings and so may now more likely be flagged as spam. You need to changed these to send e-mails from your mail e-mail provider's server. Other mail servers can include:
- Other e-mail clients.
- Smartphones.
- Servers where you send mail from.
It used to be quite common to have to use your internet providers SMTP server to send mail as they would not provide access to other SMTP servers in an attempt to reduce spam. Similarly some mobile phone carriers used to only allow access to their SMTP server. This is less common now, and SMTP isn't really used for user email (as they don't go into your sent items), but you should still check any SMTP settings you have had to manually enter.
Servers are more of an issue if you are sending out any automatic mails (e.g. alerts, news letters...etc.) from your domain. Usually they are sent via the servers local SMTP service but, as per above, this should now come from your mail e-mail servers SMTP server to apply the DKIM signature and also to prevent the SPF setting from blocking your mail. If you don't send any automatic mail then you can skip this section on to the next section.
How you do this depends exactly on your server set up. On linux servers mail is usually sent via the Postfix service, or sometimes the older Sendmail application. As Postfix is more common, I'll describe how to set this up, again using Google Apps as the example.
First of all check the relay is set up in Google Apps at Google Apps at Apps > Google Apps > Gmail > Advanced Settings > SMTP Relay service. You have a number of options here:
- Allowed senders. You should probably set this to "Only addresses in my domain".
- Authentication. You can optionally restrict this to an IP address(es) if you only want certain servers to send mails or require SMTP authentication (which involves setting your username and password on your server and also means you have to use the "allow less secure apps" setting). I'm going for IP address Authentication as I don't like leaving my Google Apps password lying around, only have limited servers and don't particularly want to turn on the "allow less secure apps" setting.
- Encryption. I'm ticking this. E-mail should be secure and sent encrypted rather than in plain text.
The Postfix config is usually available in /etc/postfix/main.cf depending on your linux distribution. You should take a backup of this file:
cp /etc/postfix/main.cf /etc/postfix/main.cf.20160406
Next edit this file. I recommend using TLS to encrypt your mail if your e-mail service provider supports this (Google Apps does), in which case you can add config like this:
relayhost = [smtp-relay.gmail.com]:587 smtp_use_tls = yes smtp_tls_CAfile = /etc/ssl/certs/ca-bundle.crt
You should also explicitly set your domain if you've used the "Only addresses in my domain" option above or your mails will fail to send:
myorigin = tunetheweb.com
Assuming your have a set of common CA certs in /etc/ssl/certs/ca-bundle.crt.
Then reload the config:
sudo postfix reload
Next try to send a mail from a mail in your domain to another mail address you have access to outside of the domain you are setting up:
echo "Testing..." | mailx -r barry@tunetheweb.com -s "Test Subject" test@example.com
Now check the postfix log (/var/log/maillog on Centos) and confirm there were no errors and mail was successfully sent and then check it arrived. IF you see a problem like this:
connect to smtp-relay.gmail.com[2607:f8b0:400e:c03::1c]:587: Network is unreachable
then it means your server does not yet support IPv6, attempts that first and then tries IPv4. The mail will still be delivered but a slightly confusing error message. Add the following line to /etc/postfix/main.cf and to prevent this error:
inet_protocols = ipv4
And then restart postfix completely (not just a reload of the config this time):
service postfix stop service postfix start
Also if you see mention of this in the postfix logs:
SASL authentication failure: No worthy mechs found
Then you may need to install the cyrus-sasl package:
yum install cyrus-sasl{,-plain}
Restart again and hopefully everything should work now.
Your server is now configured to send mails via Googles mail servers which will allows SPF and DKIM to work properly.
Support
SPF and DKIM is now fairly common, and nearly all larger companies use them, so all decent mail servers support these features. There used to be concerns about mail forwarders not correctly handling SPF setting and so leading the next mail server in the chain to reject the mail but that isn't really an issue anymore.
The Downsides
The main downsides are the set up and in managing any other systems that send mail to ensure they use them too, as discussed above. Other than that it's pretty much a matter of setting it up and forgetting about it.
Summary
SPF and DKIM are now fairly common settings used to try to protect your server from SPAM and ensure legitimate traffic does not accidentally get flagged as SPAM leading to your customers missing mails from your domain. I recommend taking the time to set them up and use them to ensure mails do not incorrectly get flagged as Spam.
This page was originally created on and last edited on .
Tweet